Once you create a Roster Import file, you can import the data. In addition to student rosters, you can import other types of files too - for example, a .zip file as part of a Student Transfer, Student Lexile Transfer, Student Promotion, or Data Aggregation processes.
Important: Always back up the SAM database before importing files.
The steps to import different file types match those used to import student data. When prompted, select the file type to identify the data type to import.
1. From the SAM home page, double-click My District located above the SmartBar or you can click the Roster tab. The district Profile page appears.
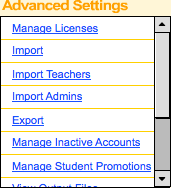
2. From the Advanced Settings menu, click the appropriate import link to launch the Import Wizard. The Import Wizard launches.
– Import: Use the import option to import student data or a file other than a roster import file
– Import Teachers
– Import Admins
3. From the Select a File to Import dialog, enter the file name or click Browse to navigate to the import file. Click Choose File for a Macintosh.
– To see a template of the .csv file, click CSV Template.
– To view and select a Roster Import file on the SAM server, click View Server Files. Select the file to import and click Next.
4. From the Select File dialog, click Browse or Choose File for a Mac iOS-based computer to locate the file to import into SAM on the computer’s hard drive.
5. Select the file and click Next. Based on the type of file, the system identifies and performs the import operation necessary from the following types:
– Aggregate Data: Copy the roster and student performance data to include in school- or district-wide aggregated reports.
– Transfer Student Data into SAM: Move student rosters and performance data from a different SAM server to the SAM database.
– Import .csv Roster Data: Import student roster information using a .csv file into the current SAM server.
– Import RI Lexile® Data: Copy selected student RI Lexile measures from a different SAM database to the new SAM database.
6. On the Confirmation dialog, click Import to import the file.
1. From the SAM home page, click the Roster tab to access the district profile.
2. From the Advanced Settings menu, click the Export link to launch the Export Wizard. The Export Wizard launches in a new browser page.
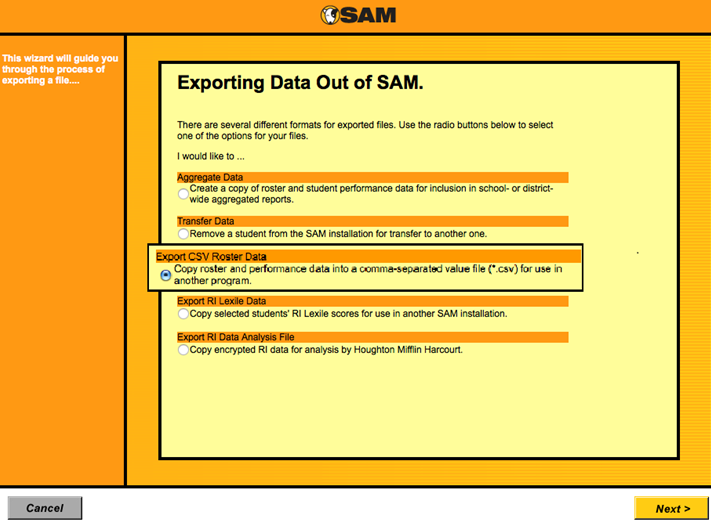
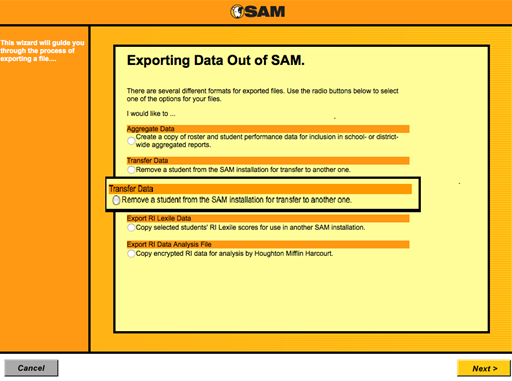
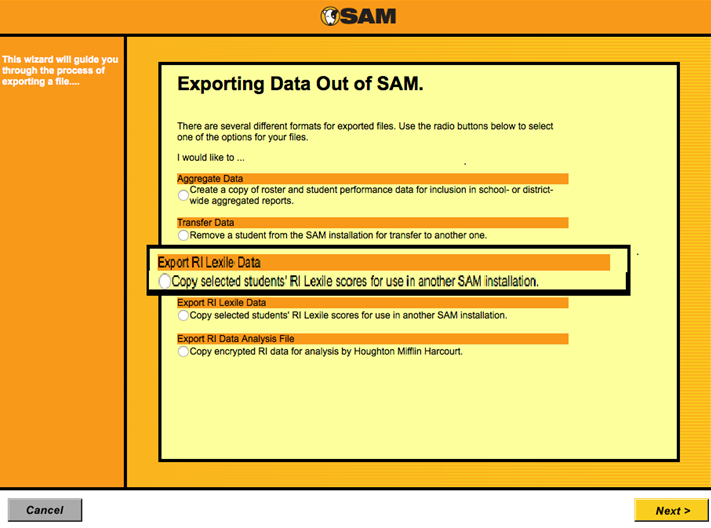
3. Select the reason from the following export types and click Next:
– Aggregate Data: Copy and export roster and student performance data to include in school- or district-wide aggregated reports. This process creates a .zip file that you can use to import to an aggregation server.
– Transfer Data: Move student roster and performance data from a SAM database to a different database using a .zip file.
– Export .csv Roster Data: Export student roster information from a SAM database for use in another application. This process creates a .csv file that you can open in Microsoft Excel.
– Export RI Lexile Data: Export student RI Lexile measures from a SAM installation to another installation using a .zip file.
– Export RI Data Analysis File: Use this option only with the direction of district or school administrators and HMH technical support.
Depending on the export reason, the Export Wizard displays one of the following pages:
– Aggregation: Select the programs that will run aggregate reports and click Next to export the aggregated data.
– Roster and Performance Data:
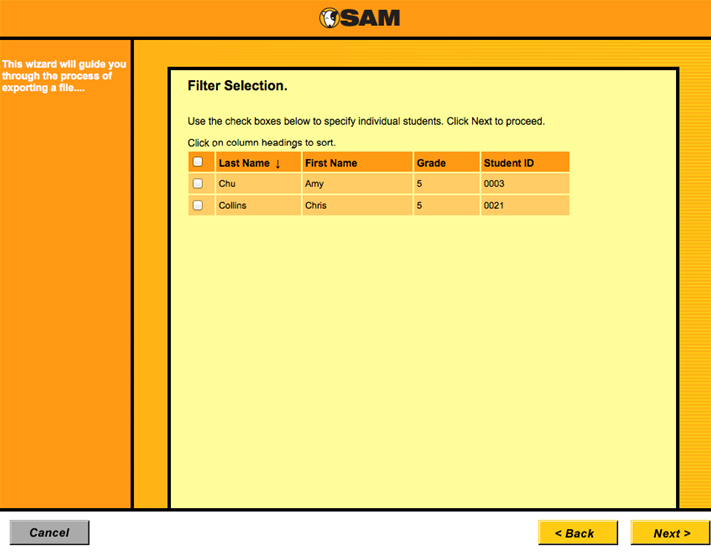
○ Choose the students for whom to export data. A Time Period Selection page appears.
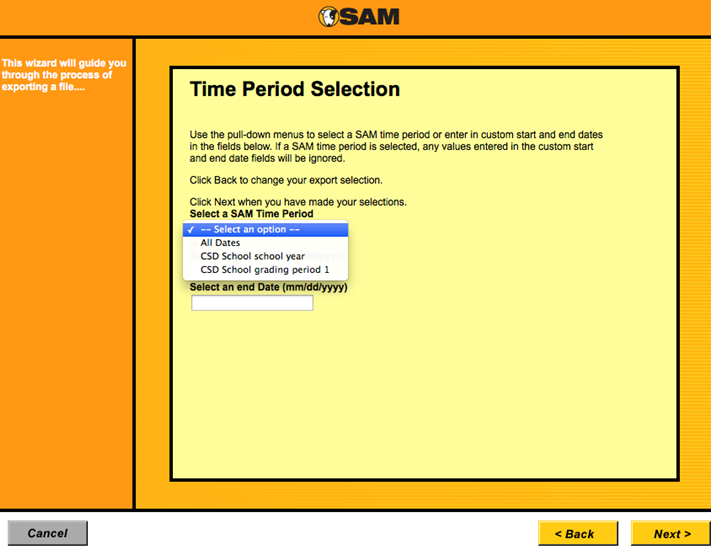
○ Select a date range for which to export data and information and click Next. A Program Selection page appears.
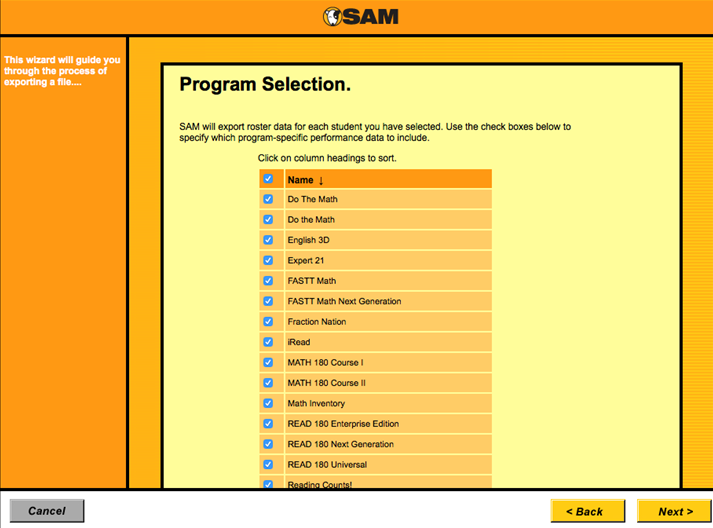
○ Select the programs that the student used that needs data exported and click Export.
– RI Lexile Data: Select a school, class, or students for which to export measures and click Next. An Export Confirmation dialog appears.
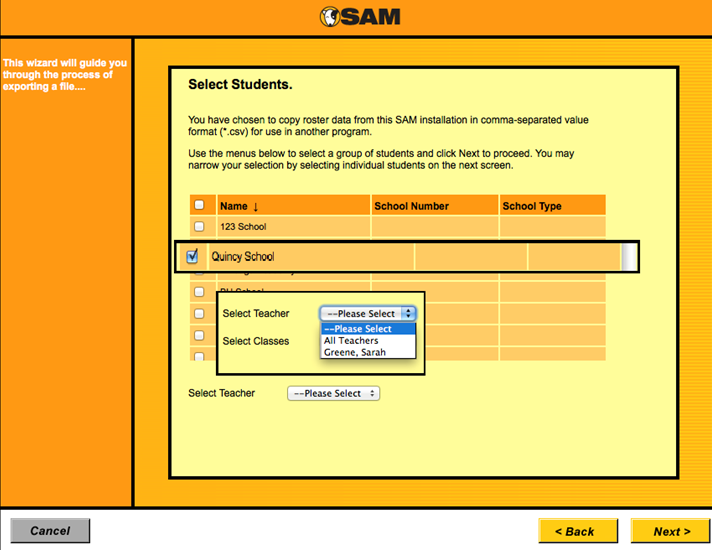
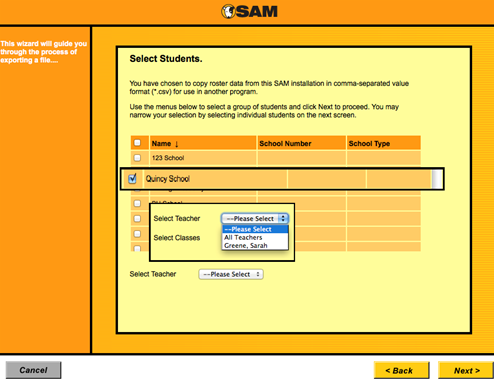
4. Use the drop-down menu to select the school, teacher, and class data to export and click Next. The Filter Selection page appears.
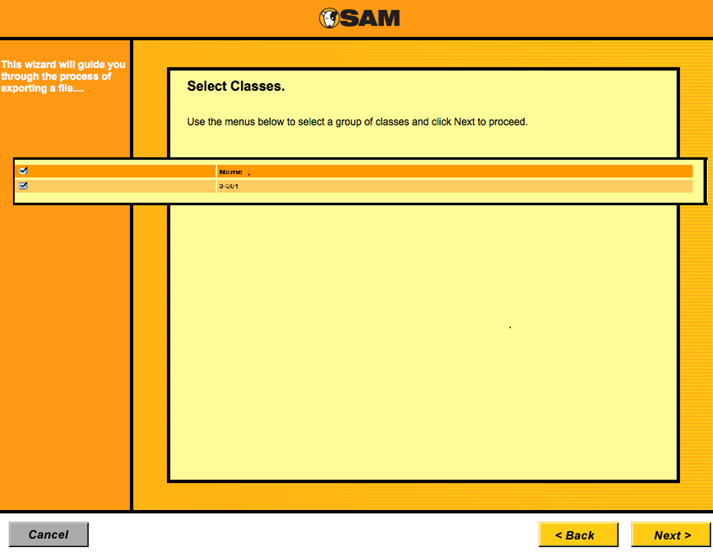
5. Click the associated check boxes to select the classes for the data export and click Next.
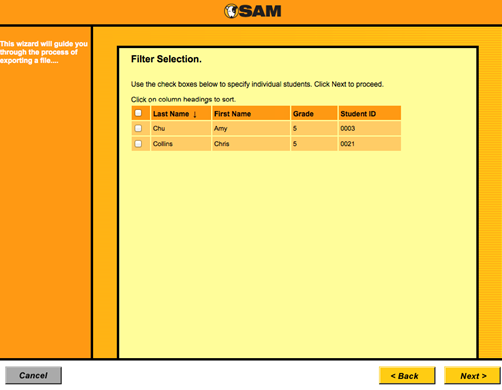
6. Click the associated check boxes to select the students for the data export and click Next.
7. From the drop-down menu, select a time period for data and click Next.
8. Click the associated check boxes to select the programs for the data export. The data points to export display in parentheses next to the program.
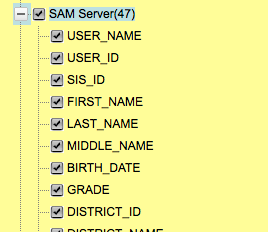
9. Click the plus ( + ) symbol next to the program name to expand the list and select or deselect individual data points and click Export. The Processing Request page appears and the export request begins to process.
Note: Some versions of Microsoft Excel are limited to 256 columns. When the number of data points exceeds 256, some columns do not display in the application. However, all of the data is contained in the .csv file.
10. Close the browser to return to the SAM page. A notification appears in the Message Center on the home page when the export file is ready. Exporting a large file can take a significant amount of time.
To access the file, click Show Me in the Message Center. The file opens a new browser. You can save the file to a specific location or to a portable media, such as a flash drive or CD-ROM.
Selected data points are available for both local and hosted installations and may be selected individually. SAM server, or profile, data can be excluded when exporting application data. This can be useful when exporting to a target where students need to remain anonymous. However, this can render product data unidentifiable, depending on the selected data points.
Contact HMH Technical Support, 1-800-283-5974, with questions or concerns.
For repetitive data points, such as tests or topics, deselecting a data point excludes it for each repeating set. A running total of selected data points displays at the bottom of the page, with a warning when the total exceeds 256.
Important: Store exported data files in the SAM database or save to a different location on the computer.
Fields in SAM such as school number, class ID, and date range allow users to customize exports for data needs. Additionally, users can select a subset of schools that allow student-data exports from a group of schools, rather than one or all schools in the district.
The Student Transfer process removes all performance records, including READ 180 Success Zone and System 44® Success Strand fluency recordings, from the student’s current school and prepares a file that you can use to import the student’s data to another SAM database.
Students who transfer are deleted from an existing SAM database. The Student Transfer export helps teachers or administrators who aggregate data across several SAM installations to maintain clean databases for aggregation. Otherwise, the same student could exist in more than one SAM installation in the district.
1. Back up the existing database before exporting any files.
2. Double-click My District above the SmartBar or click the Roster tab at the district level to access the district’s Profile page.
3. From the Advanced Settings menu, click Export to launch the Export Wizard in a new browser.
4. Click Transfer Data and click Next. The Select Students page appears.
5. Use the drop-down menus to select the school, teacher, and class for data to export and click Next. The Filter Selection page appears.
6. Click the associated check boxes to select students to transfer from the SAM installation and click Next. The Confirm Selection page appears.
7. To modify choices, click Back to return to the Filter Selection page or click Export to continue.
8. Close the browser to return to the SAM page. A notification appears in the Message Center on the home page when the export file is ready. Exporting a large file can take a longer amount of time.
To access the file, click Show Me in the Message Center. The file appears in a new browser. You can save the .zip file to a specific location or to a portable media, such as a flash drive or CD-ROM. Use the file to import student data to the new SAM installation. See Roster Import for instructions to import the student transfer file to another SAM installation.
Note: Unlike the Student Transfer process, the Student Lexile Transfer process does not remove student profile or performance data from the current SAM installation. It copies the student’s Lexile measure to another SAM installation.
1. Double-click My District above the SmartBar or click the Roster tab at the district level to access the district’s Profile page.
2. From the Advanced Settings menu, click Export. The Export Wizard appears in a new browser.
3. Click Export RI Lexile Data and click Next. The Select Students page appears.
4. Use the drop-down menus to select the school, teacher, and class for data to export and click Next. The Filter Selection page appears.
5. Click the associated check boxes to select students to transfer the Lexile measures from the SAM installation and click Next. The Confirm Selection page appears.
6. To modify choices, click Back to return to the Filter Selection page or click Export to continue.
7. Close the browser to return to the SAM page. A notification appears in the Message Center on the home page when the export file is ready. Exporting a large file can take a longer amount of time.
To access the file, click Show Me in the Message Center. The file appears in a new browser. You can save the .zip file to a specific location or to a portable media, such as a flash drive or CD-ROM. Use the file to import student data to the new SAM installation. See Roster Import for instructions to import the student Lexile transfer file to another SAM installation.
Important: Do not perform student promotions while the SAM database is in use. Run student promotions only when no other users are logged in to SAM.
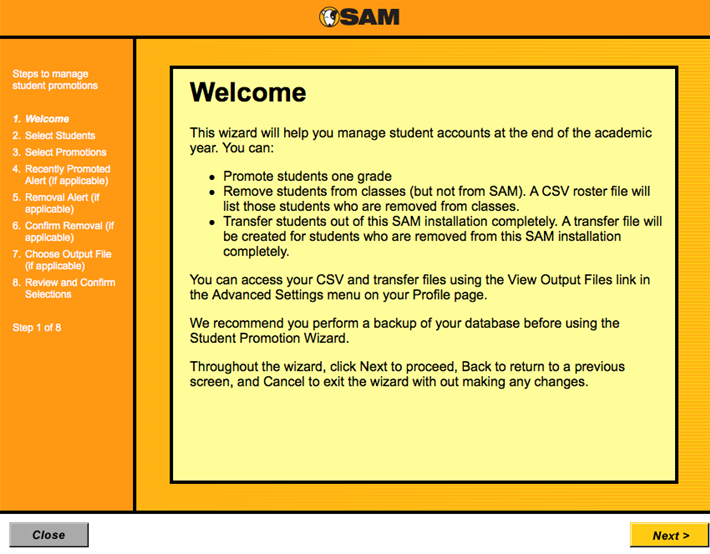
The Manage Student Promotions Wizard allows administrators to perform one or more of the following tasks:
● Promote Students: Promotes students a single grade while leaving the students in current classes in the SmartBar.
● Remove Students from All Current Classes: Removes students from the SmartBar but leaves the students in the SAM installation and accessible with the Manage Inactive Accounts function. This option automatically creates a .csv file that makes it easy to edit the grade and class names in Excel or a similar spreadsheet program. Using the Automatic Account Creation process, SAM places promoted students in new classes. See Roster Import for additional information.
● Remove Students from the SAM Installation: Removes students from the current SAM database and prepares a transfer file to move students to a different SAM installation. The wizard creates one file for each student or a single file with all students removed at a specified time. Use the files to transfer students to another SAM installation.
Important: Always back up the SAM database before using the Manage Student Promotions Wizard.
1. Double-click My District above the SmartBar or click the Roster tab at the district level to access the district’s Profile page.
2. From the Advanced Settings menu, click Manage Student Promotions. The Manage Student Promotions Wizard appears in a new browser.
3. Click Next. The Select Students page appears.
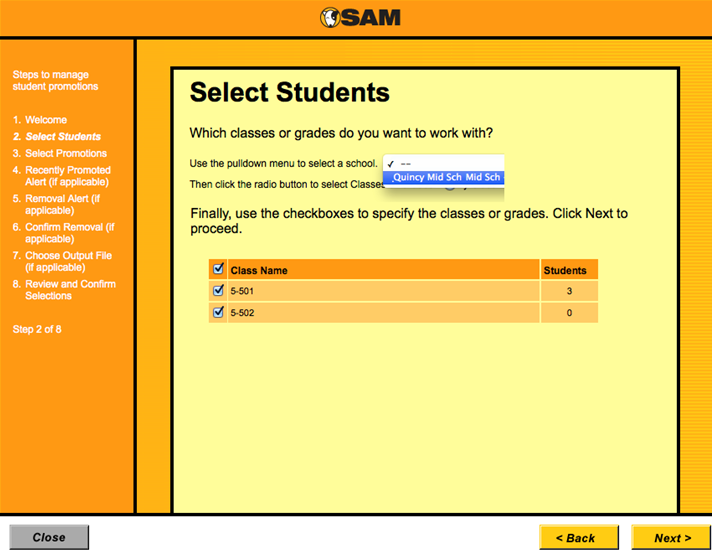
4. Use the drop-down menu to choose a school and then click By Class or By Grade.
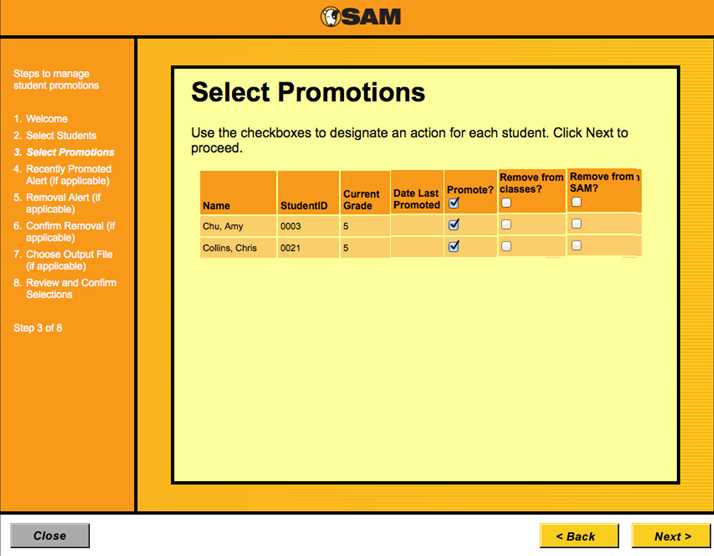
5. Use the associated check boxes to select the grades or classes with students to promote and click Next. The Select Promotions page appears with a list of all students available for promotion.
6. Click the associated check boxes to choose the students to promote, remove from classes, or remove from SAM and click Next.
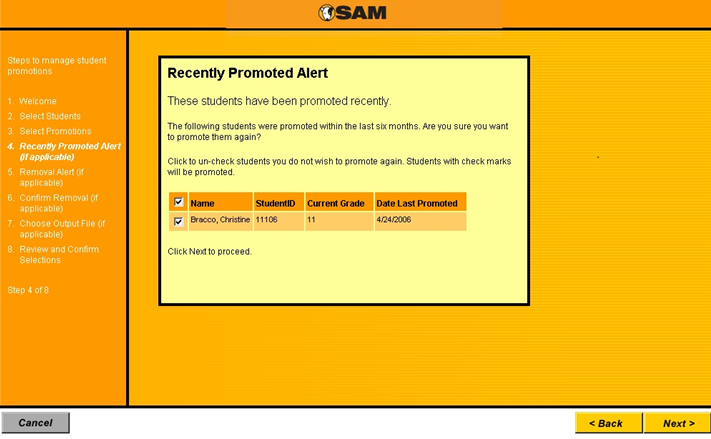
– Selecting a student for promotion who was promoted in the last six months prompts a warning alert. Deselect students who should not be promoted again and click Next.
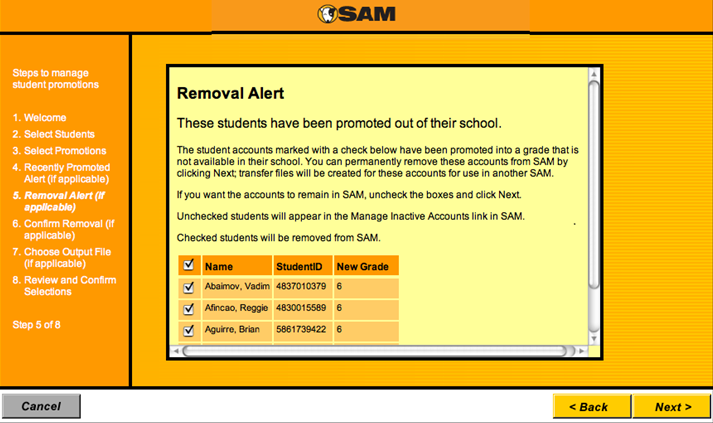
– Promoting students to a grade not in the existing SAM installation prompts a warning alert. Deselect students who are not promoted out of the database and click Next. Note that deselected students are moved to Inactive Accounts and students who remain selected are removed from SAM.
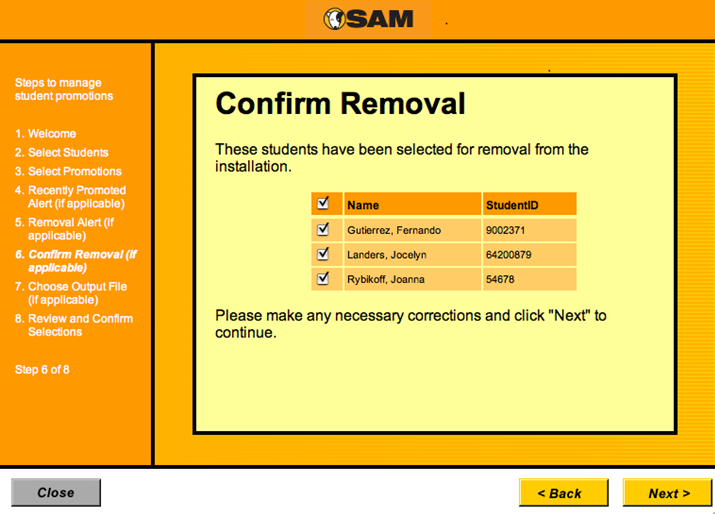
7. Confirm the removal of students completely from the SAM installation and click Next. Students removed from SAM are included in a transfer file that can be used at a later date to import the records to a different SAM installation. Deselect any students that should not be removed.
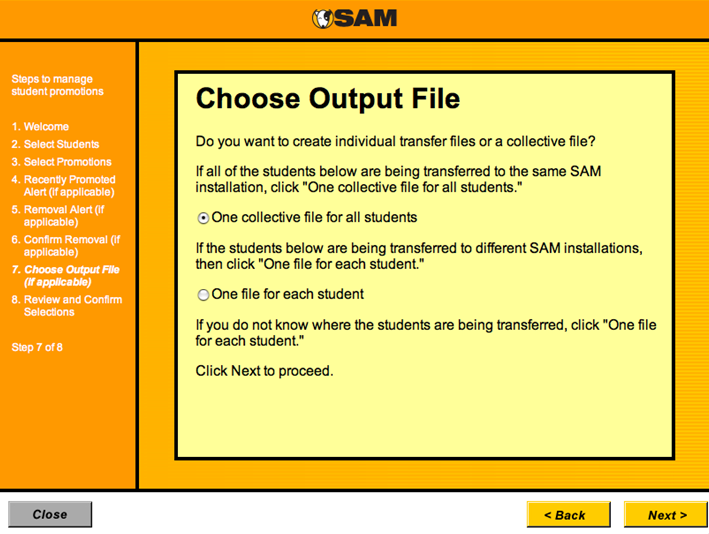
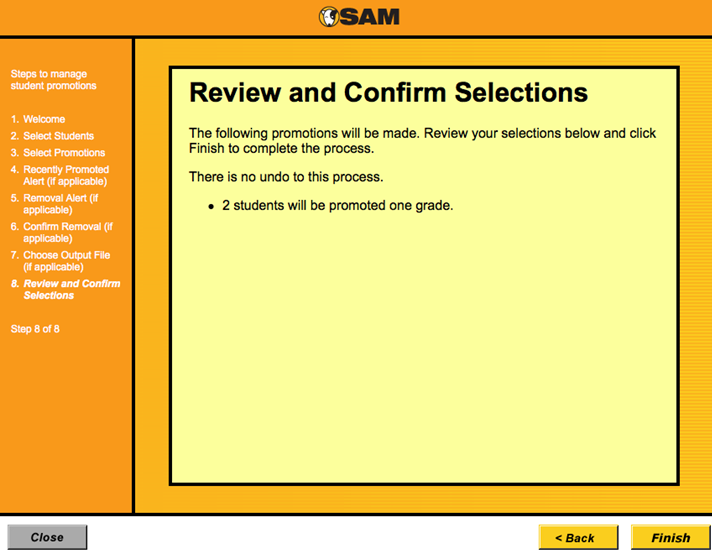
8. From the Choose Output File page, select the option to create a collective transfer file for all student files (when students will go to the same school) or individual files for each student (when students will go to different schools) and click Next. The Review and Confirm Selections page appears.
9. Verify the information on the Review and Confirm Selections page.
10. To modify choices, click Back to return and change your selections or click Finish to complete the Student Promotion process.
11. Close the browser to return to the SAM page. A notification appears in the Message Center on the home page when the export file is ready.
If the records need to be imported into another SAM installation, click Show Me in the Message Center. The file appears in a new browser. You can save the .zip file to a specific location or to a portable media, such as a flash drive or CD-ROM. Use the file to import student data to a different SAM installation.
Note: You can View Output Files to access the .zip file containing the records.
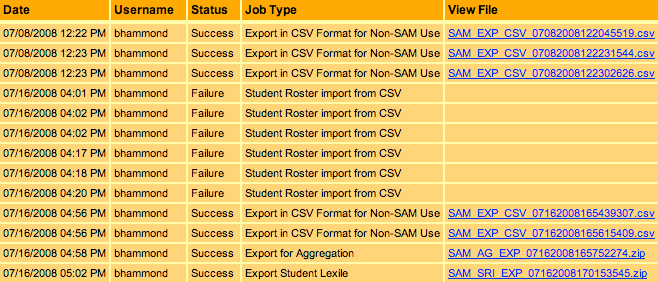
1. Navigate to a location on your hard drive and click Show Me next to the file in the Message Center. The Import/Export Jobs page appears in a new browser.
2. In the View File column, right-click the associated link for the file you need to save as a .csv file
3. From the drop-down menu, click Save Target As and change the file extension to .csv; otherwise the file saves as an HTML file.
4. Navigate and select a file location in the directory dialog and click Save.
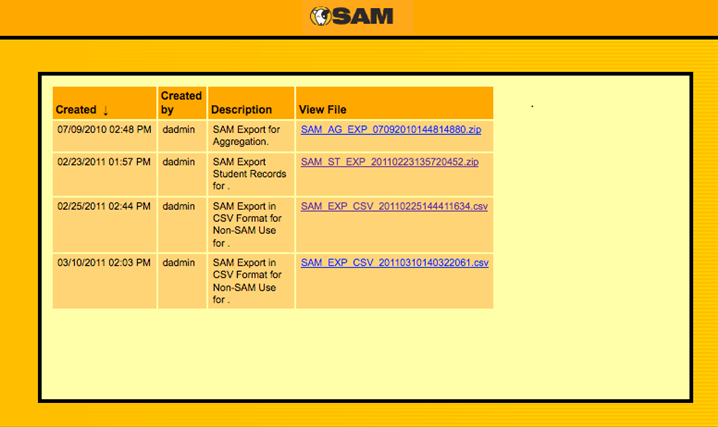
SAM saves all output files created during data activities such as exports, student promotions, or backups.
1. From the SAM home page, double-click My District located above the SmartBar or you can click the Roster tab. The district Profile page appears.
2. From the Advanced Settings menu, click View Output Files. The View Output Files page launches in a new browser page.
3. To download and review a file, right-click the associated link for the file name.
4. From the drop-down menu, select All Files from the Save Target As drop-down menu and change the file extension to .csv; otherwise the file saves as an HTML file.
5. Navigate and select a file location in the directory dialog and click Save.
©2023 Houghton Mifflin Harcourt. All Rights Reserved.