 Click
for details.
On the My Lessons page, you can assign custom lesson resources to students and classes.
1. Open a
custom lesson.  Click
for details.

2. Locate
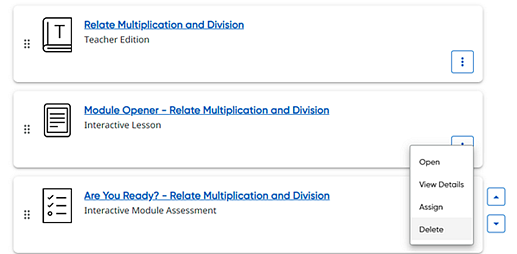
the card of the resource to be assigned, click the vertical ellipsis  button, and select the Assign option.

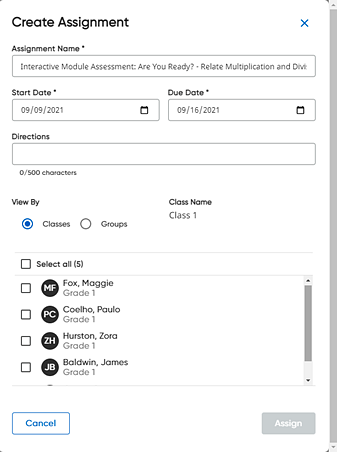
A Create Assignment dialog box appears.

3. Complete the assignment fields as follows.
Field |
Action |
Assignment Name |
Note that the assignment name defaults to the module or lesson name. ➔ Type a different name for the assignment, if needed. |
Start Date |
This is the date that the assignment will be available to the selected students. Note: – For most assignments, the start date defaults to the current date. – For Growth Measure test assignments: ○ The start and end dates are predetermined; if your administrator allows, you may change the start and end dates but only within the preset test window. ○ Best practice recommends administering growth measure tests once within each test window. However, teachers can reassign the growth measure test more than once, if needed. Only scores from the final, submitted test within the test window are stored and displayed on the growth reports.
➔ Click the calendar icon and select a different start date, if needed.
|
Due Date |
This is the date that the assignment is due to be completed. Note: – For most assignments, the due date defaults to seven days (1 week) from the current date. – For Growth Measure test assignments: ○ The start and end dates are predetermined; if your administrator allows, you may change the start and end dates but only within the preset test window. ○ Best practice recommends administering growth measure tests once within each test window. However, teachers can reassign the growth measure test more than once, if needed. Only scores from the final, submitted test within the test window are stored and displayed on the growth reports.
➔ Click the calendar icon and select a different due date, if needed. |
Directions (Optional) |
➔ Type instructions for the students to follow while completing the assignment. |
View By / Filter By |
a. In the View By list, select Classes to assign to a class (or classes) or select Groups to assign to a group (or groups). b. If you want to view the list of students in a class or the groups created for a particular class, click the down arrow in the Filter By list and select a class.
If you select a class, the check boxes for all the students in the selected class are checked by default, indicating that all students in the class are selected to receive the assignment.
If you select a group, all of the students within that group are selected to receive the assignment.
c. If you prefer to create the assignment for only some of the students in a selected class, clear the check box beside any student who is not to receive this assignment. In the example below, the teacher chose not to create this assignment for two students—Taya Johnston and Reuben Hegmann.
|
4. Click
 . The
assignment is created and will be available to the selected students,
class(es), or group(s) on the designated start date. You can monitor assignment
status and manage assignments on the Assignments
page. See Manage Assignments
for details.
See Also: