The Assignments Overview and Assignment Details pages provide an easy-to-use layout to help you navigate and manage assignments. Details about both of these pages are provided as follows.
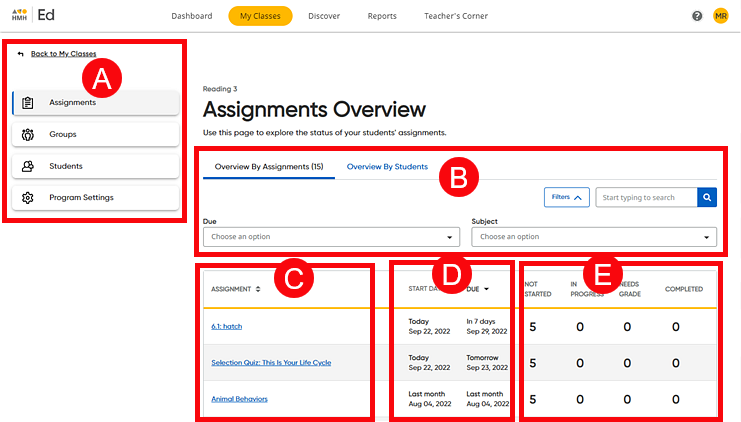
When you select a class on the My Class tab and then click Assignments in the left panel, the Assignments Overview page opens by default to the Overview By Assignments tab. This page displays basic information for all assignments created.
➔ Click a letter or outlined area to view details.
.
The overview page includes the following information:
Left Navigation Panel |
||
|
In the top left corner of the page, you can click the link to return to your My Classes page. The left panel provides the following links: ● Assignments – Opens the Assignments page (details provided in this topic; see also Manage Assignments) ● Groups – Opens the Groups page ● Students – Opens the class Students page; provides a list of students enrolled in the class and details about the class as well as roster management options. See Manage Class Rosters for details. ● Program Settings – Opens the Program Settings page; allows you to select the programs to be available for each of your classes. See Manage Programs for Classes for details.) |
|
Overview By Student Tab, Filters, and Search |
||
|
On the Assignments Overview page, you can view the assignment status by student when you click the Overview By Student tab. ● Overview By Student– Provides a list of the number and status of assignments for each student in the selected class
You can then view the assignments for a student, click the student's name. The Assignment Details page for the selected student appears showing the status of all the student's assignments.
➔ For complete details, see View Assignments by Student.
You can narrow the list of assignments on the Overview By Assignments tab using the Search field and/or Filters lists. ● Search – Allows you to search for an assignment by the assignment name, as follows: ➔ In the Search field, type all or part of the assignment
name and then click the magnifying glass
To remove a search criteria, click the X in the Search field. (This clears the search criteria only; it does not clear any filter selections you may have made.)
● Filters – Allows you to filter assignments based on due date and subject, as follows: ➔ Click the Filters button to access the filter lists, which include Due and Subject. Click a list to see the filter options, select one or more options, and then click Apply.
The list of assignments updates to show only those that match your selected filters, and the filters that you select are listed below the filter lists in an Active Filters area. ➔ To remove a filter, click the X for the filter in the Active Filters area; to remove all the selected filters, click Clear All Filters. (This clears the filter selections only; it does not clear any search criteria you may have entered.)
Note: The Search and Filter criteria that you specify on the Assignment Overview page remains activated when you view the Assignment Details page of one or more assignments and then return to the Assignment Overview page.
|
|
ASSIGNMENT |
||
|
Above the list of assignments, the number of assignments (#) created for the selected class is displayed, which allows you to quickly see how much work has been assigned to this class throughout the year. Up to 50 assignments can be listed on this page. Additional assignments can be viewed using arrows at the bottom of the page to scroll through additional pages. The Assignment column lists the complete assignment title for each assignment you have created and allows you to sort the list and open the details for any assignment. ➔ Click the ASSIGNMENT column header to sort the assignment list in alphabetic order.
➔ Click an assignment name to open Assignment Details page for the assignment. (See the description of this page below this table.) |
|
START DATE and DUE |
||
|
These columns displays the start date and due date that you set for each assignment, displayed as both as relative dates and calendar dates. The default setting for the assignment list is from the newest due date to the oldest due date. ➔ Click the START DATE or DUE column header to sort the list from oldest to newest. |
|
STATUS |
||
|
The final four columns display the number of students whose assignment status are any of the following: |
|
|
Assignment Status |
Description |
|
NOT STARTED |
Assignment not started and never opened |
|
IN PROGRESS |
Assignment opened but not completed |
|
NEEDS GRADE |
Assessment completed and requiring at least some manual scoring |
|
COMPLETED |
● For non-assessment assignments: assignment completed ● For assessments: assessment is completed and scored Note: Assessments may be scored automatically, or they may require some manual scoring. |
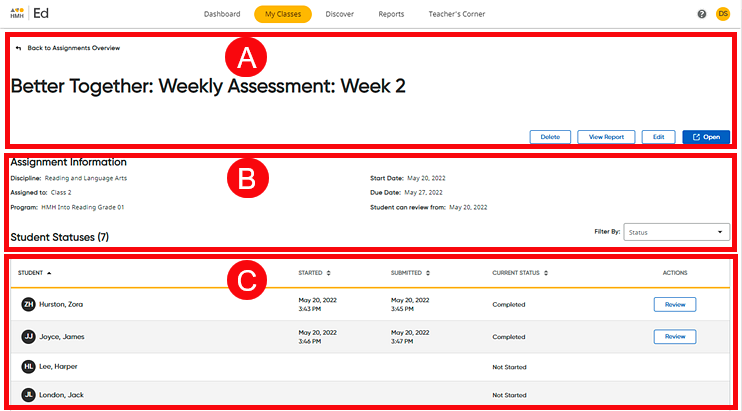
The Assignment Details page displays specific information for the selected assignment.
➔ Click a letter or outlined area to view details.

Assignment Title Bar |
||
|
The name of the assignment appears at the top of the page. The upper left corner of the page provides a link to return to the Assignments Overview page. |
|
|
The assignment title bar area includes the following options: |
|
|
|
|
Assignment Information |
||
|
The following information about the assignment is provided: ● Assignment Directions – the instructions that you provided (if any) to students for this assignment ● Discipline – the subject of the resource used in the assignment ● Start Date – the date that the assignment was made available to students ● Due Date – the date that the assignment is to be completed ● Assigned to – the class to which the assignment was assigned ● Program – the program under which the assignment resides ● Student Statuses (#) – the number of students to whom this assignment is assigned so you can see if it is a class, group, or individual assignment |
|
|
The Filter By box allows you to change the assignment table to display only assignments of the selected status, as follows: |
|
|
|
● In Progress ● Not Started ● Ready to Grade ● Scoring in Progress ● Completed |
Student Statuses |
||
|
The table lists the students who received this assignment and displays the following assignment status information:
● STUDENT – names of students who received the assignment ➔ Click the STUDENT column header to sort the student list in reverse alphabetic order.
● STARTED – shows when a student began the assignment ➔ Click the STARTED column header to sort the list from oldest start date to newest.
● SUBMITTED – shows when the student completed the assignment. This informs the teacher if a student submitted an assignment after the due date or if a student took longer than the class average time to complete an assignment, which may indicate that the student struggled with the skill/topic being assessed. ➔ Click the SUBMITTED column header to sort the list from oldest submitted date to newest.
● CURRENT STATUS – shows each student's status for the assignment, as follows: – Not Started – assignment not started and never opened – In Progress – assignment opened but not completed – Ready to Grade – assessment completed and requiring at least some manual scoring – Completed – for non-assessment assignments: assignment completed; for assessments: assessment is completed and scored ➔ Click the CURRENT STATUS column header to sort the list by status.
● ACTIONS – indicates that the assignment is ready for the teacher to take action and provides a link for the teacher to begin the expected the action: – Grade: ➔ Click the link to open the assessment and manually grade items. (See Manually Score an Assignment for details.)
– Review: ➔ For completed assignments that are assessments and writing activities, click to open, view, and add feedback. (See Add Feedback to an Assignment for details.) Note: If the assignment is an eBook, you must use the Open button at the top of the Assignment Details page to review it. The eBook opens in a separate browser window and allows you to review each student's annotations. (See Navigate eBooks for details.)
– Feedback: ➔ For assessments to which you have already added feedback, click the Feedback button to review your comments.
For feedback added to an eBook assignment, click the Feedback icon in the Feedback column.
|
|
See Also: