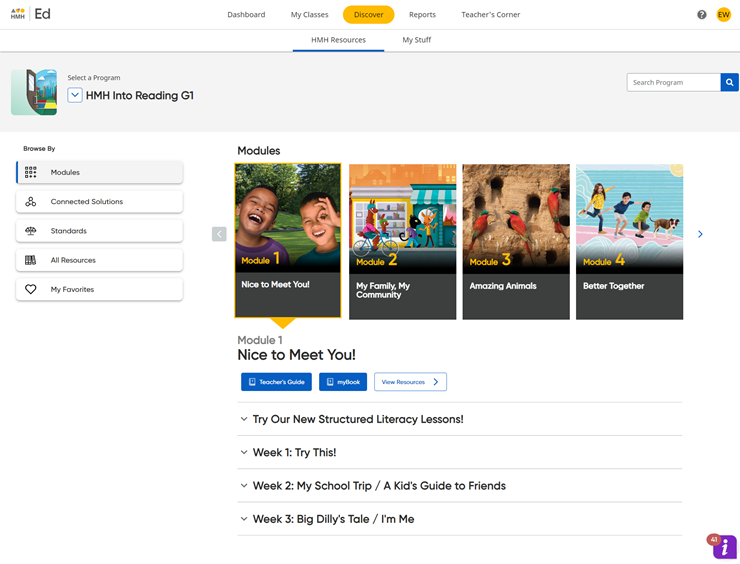
1. In the Ed banner, click the Discover tab. The HMH Resources tab of the Discover page appears.

Note: If you have logged in to Ed before this session, the module or unit within the program that you were viewing when you last logged out is displayed and identified as LAST VIEWED.
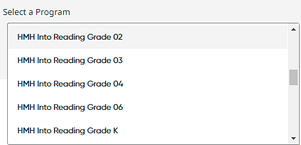
2. In the program list, select a program.

Programs at the top of the list are the program(s) associated with this class that you selected on the Program Settings page. These are the same programs your students see.
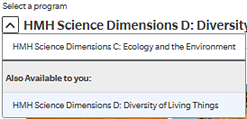
 If
available, the Also Available to you
section provides additional programs for you that are offered with the
currently selected program. Programs listed in the Also Available to you
section can be used with the students in your class but will not
appear in your students' program list.
The page updates to display content associated with the selected program. The Discover page initially defaults to the Modules view; if needed, select Modules in the Browse by panel on the left side of the page.
Note: The labels used for the content segments in this widget can vary; labels may be modules, units, lessons, chapters, or some other label, depending on the selected program.
3. In
the Modules/Units widget, use
the Show previous (![]() ) and Show next (
) and Show next (![]() )
buttons to navigate through the program's modules or units and then select
a module or unit. The list of lessons for the selected module or unit
appears.
)
buttons to navigate through the program's modules or units and then select
a module or unit. The list of lessons for the selected module or unit
appears.
4. Click
the  button
located to the right of the myBook
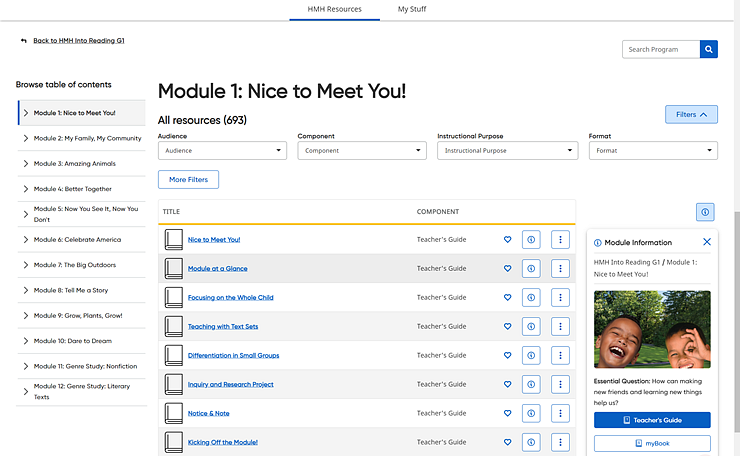
button. The Module/Unit Resources page appears and lists
resources for the selected module or unit. The left panel displays the
table of contents for the selected program and highlights the selected
module/unit.
button
located to the right of the myBook
button. The Module/Unit Resources page appears and lists
resources for the selected module or unit. The left panel displays the
table of contents for the selected program and highlights the selected
module/unit.

5. On the Module/Unit Resources page, do any of the following:
Action |
Steps |
Filter the list of resources |
The Filters lists allow you to further narrow the list of resources to more easily locate the resource that you need by selecting options from any or all of the lists. Filter options differ by program and level.
a. Within any filter list, select option(s) by which to filter the resources, and then click Apply. Multiple filter options can be selected.
b. If
available, click the More
Filters button to view
additional filters.
For each filter selected, the list updates to show only those resources that match your selected criteria, and your filters are displayed in the Applied filters area.
Note: In the Applied filters area, you can remove filters as follows: – To remove any selected filter, click the X for the filter. – To remove all the selected filters, click the Reset all filters link.
You can also locate resources by typing search criteria in the Search field. See Search for Resources for details. |
Locate a resource |
➔ Scroll
through the list of resources, and if necessary, click
|
Open a resource |
➔ Within the resource list, click the resource title.
or Click the vertical ellipsis button
The selected resource appears in a new browser window.
Note: Unlike other assessment types, Growth Measure assessments are not available to open and view. |
Assign a resource |
➔ Click the
vertical ellipsis button
See Create Assignments for details. |
Add a resource to a lesson |
➔ Click
the vertical ellipsis button
See Add Resources to Lessons for details. |
Copy a resource to Google Drive |
➔ Click
the vertical ellipsis button See Copy Resources to Google Drive for details. |
View resources related to the selected resource |
➔ Click
the vertical ellipsis button
You can click a resource link to view the details page for the related resource, and then you have the option to open it, assign it (if assignable), or add it to your lesson(s).
|
View the details of a resource |
➔ Click
the vertical ellipsis button
The resource details page appears providing a description of the resource and listing the standards that are associated with the resource.
Depending on the resource, the resource details page may provide related resources and options to assign, add the to lessons, and open the resource.
If necessary, click the Show More button to view the complete list of standards.
To return to the Modules/Unit Resources page, click the Back to Resources link at the top of the page. |
View more information about a resource |
➔ Within
the resource list, click the
The Resource Information panel on the right side of the page displays a summary of the selected resource.
– If the resource type is eBook, PDF, or video, the panel shows a snapshot of the first page of the resource.
– If a Lexile Level or a Guided Reading Level is available for the resource, it appears in the panel.
– Action options are provided at the bottom of the panel, including buttons to do any of the following: Assign, Add to My Favorites, Add to My Lesson, and View Details and Standards.
Note:
You can click the button above the Resource
Information panel
|
Add a resource to your My Favorites list |
➔ Click
the heart icon |
View resources for another lesson, week, or module |
➔ Within the table of contents on the left side of the page, click another lesson, week, or module.
The page updates to display the resources associated with your selection. |
See Also:
View and Open Resources by Lesson