If you have access to HMH Growth Measure, then you are able to assign HMH Growth Measure assessments to your classes. These assessments can only be assigned during the preset test window dates.
HMH Growth Measure Reading offers two assessments—GM Reading 2–12 and GM Reading K–2: Foundational Literacy, also known as the FLA.
HMH Growth Measure Math offers four assessments—GM Math K–8, GM Math Algebra 1, GM Math Geometry, and GM Math Algebra 2.
Spanish Reading Growth Measure is offered for users of Arriba la Lectura programs and all ELA programs (core, supplemental, and intervention) that are integrated with the English Reading Growth Measure.
Note: For Reading, you can choose to administer either or both GM Reading assessments to your students as appropriate, regardless of their students’ enrolled grade. When Grade K–1 students are assigned the GM Reading 2–12 assessment, they receive a Grade 2 test-level assessment. Upon successfully completing the assessment, the students receive a Scaled Score starting with “2” and all results are reported, as usual, in the Growth and Standards Reports.
Details are provided below.
➔ To view details about the differences between the GM Reading tests and recommendations about which test to assign, click the link below.
HMH Growth Measure Reading Assessments FAQs (PDF 134 Kb)
1. Do either of the following:
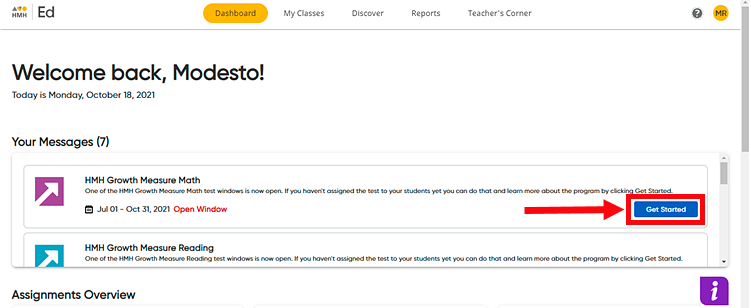
– In the Your Messages area of the Dashboard, locate the Growth Measure Program Update message for the growth measure you want to assign and click Get Started.

Note: This message appears on your Dashboard only within the preset test window dates. Once you click the link within the message box, it is removed from your list of messages.
Or
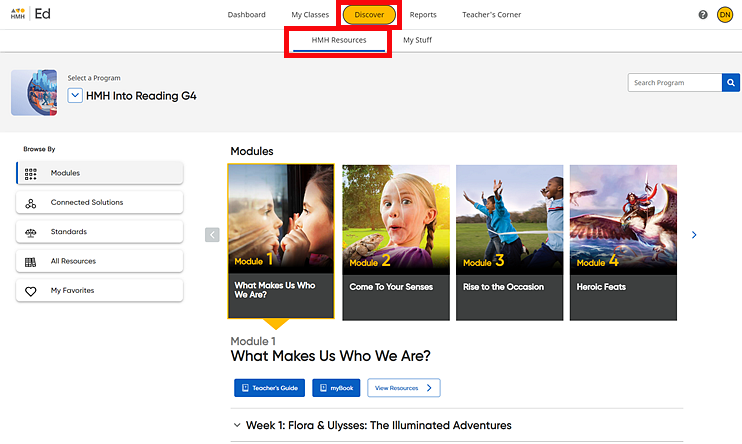
a. In the
banner, click the Discover tab
and the HMH Resources tab, and
then select the program to view from the  program
list.

b. In the Select a Program list, select the HMH Growth Measure program to be assigned.

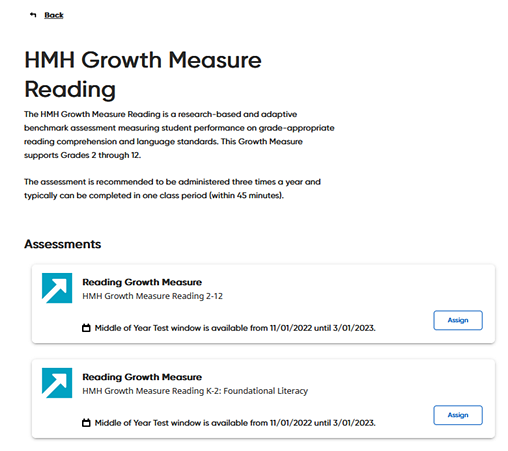
The HMH Growth Measure resource page for the selected growth measure appears.

The top of the page provides details about this particular growth measure assessment. Resource card states the current or most recent test window for this assessment. Dates for the test windows are managed by your district administrator.
 Click
to view details about test windows.
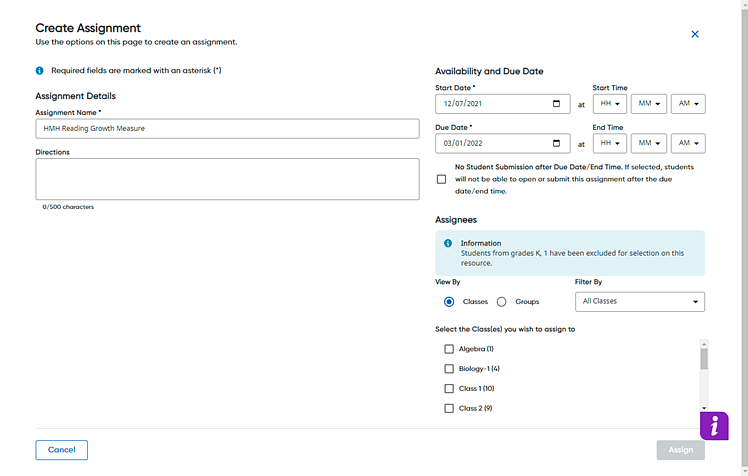
2. Click Assign to assign the assessment. The Create Assignment page appears.
Note: If the current date is not within one of the preset test windows, then the Assign button is not available.

3. Complete the assignment fields as follows.
Field |
Action |
Assignment Name |
Note that the assignment name defaults to the Growth Assessment name. ➔ Type a different name for the assignment, if needed. |
Directions (Optional) |
➔ Type instructions for the students to follow while completing the assignment. |
Start Date |
This is the date that the assessment will be available to the selected students. Note: For Growth Measure test assignments: ○ The default start and end dates are predetermined; you may change the start and end dates but only within the preset test window. ○ Within an open test window, the start date defaults to the current date. ○ Best practice recommends administering growth measure tests once within each test window. However, teachers can reassign the growth measure test more than once, if needed. Only scores from the final, submitted test within the test window are stored and displayed on the growth reports.
➔ Click the calendar icon and select a different start date, if needed.
|
Start Time (Optional) |
This is the time that the assessment will be available to the selected students. Note: – Students can only access the assessment once the start time on the start date has been reached. – If no start time is set, the assessment becomes available to the selected students at the beginning of the day (midnight) on the start date. a. In the hour (HH) list, click the down arrow and select the hour to start.
b. In the minute (MM) list, click the down arrow and select the minute to start. c. In the AM/PM list, click the down arrow and select AM or PM. (AM is the default.) |
Due Date |
This is the date that the assessment is due to be completed. If the due date is being enforced, this is the date that the selected students will no longer be able to access or submit the assessment. If the due date is not being enforced, then this is the recommended date that the assessment is due to be completed. Important:
To enforce the due date and prevent students from accessing or
submitting the assessment after the due date (or end time) has
passed, you must select the No
Data Submission after Due Date/End Time check box.
Note: For Growth Measure test assignments: ○ The default start and end dates are predetermined; you may change the start and end dates but only within the preset test window. ○ If the due date is enforced (No Data Submission after Due Date/End Time check box is selected) and no end time is specified, then students will lose the ability to access or submit the assessment at the end of the day (midnight) of the due date. ○ Best practice recommends administering growth measure tests once within each test window. However, teachers can reassign the growth measure test more than once, if needed. Only scores from the final, submitted test within the test window are stored and displayed on the growth reports.
➔ Click the calendar icon and select a different due date, if needed. |
End Time (Optional) |
This is the end time that the assessment is due to be completed. If the due date is being enforced, this is the time (on the due date) that the selected students will no longer be able to access or submit this assessment. If the due date is not being enforced, then this is the recommended end time for the assessment. Note: – If the due date is enforced (No Data Submission after Due Date/End Time check box is selected) and no end time is specified, then students will lose the ability to access or submit the assessment at the end of the day (midnight) of the due date. – If the due date is not being enforced, the due date and end time serve as a guideline only; students will continue to have access to the assessment even after the due date and end time. a. In the hour (HH) list, click the down arrow and select the hour to end. b. In the minute (MM) list, click the down arrow and select the minute to end. c. In the AM/PM list, click the down arrow and select AM or PM. (AM is the default.) |
No Data Submission after Due Date/End Time (Optional) |
This check box allows you to enforce the due date and end time, preventing students from accessing or submitting the assessment after the due date and end time. ➔ Select this check box to enforce the due date and (if specified) end time.
Note: – When this check box is selected for an assessment: ○ For teachers, the due date and end time is noted in the assignment card on the Dashboard, and a note stating "No late work accepted" appears for this assignment on the Assignment Overview page. ○ For students, a note stating "No late work accepted" appears for this assessment on the Dashboard assignment card and in the Due Date column of the Assignment page. ○ For students actively working in the assessment (assessment is open) when the due date/end time passes, they are allowed to complete and submit the assessment, even if this submission occurs after the due date/end time. However, if they close the assessment without submitting it, they will not be able to reopen the assessment. |
View By / Filter By |
a. In the View By list, select Classes to assign to a class (or classes) or select Groups to assign to a group (or groups). b. If you want to view the list of students in a class or the groups created for a particular class, click the down arrow in the Filter By list and select a class.
If you select a class, the check boxes for all the students in the selected class are checked by default, indicating that all students in the class are selected to receive the assignment.
If you select a group, all of the students within that group are selected to receive the assignment.
c. If you prefer to create the assignment for only some of the students in a selected class, clear the check box beside any student that is not to receive this assignment. In the example below, the teacher chose not to create this assignment for two students—Jack London and Mark Twain.
|
4. Click
 . The assessment will be available
to the selected students, class(es), or group(s) on the designated start
date. You can monitor assignment status and manage assignments on the
Assignments page. See Manage
Assignments for details.
When your students complete the assessment, the results are available to you on the Growth Reports page. See Open HMH Growth Reports for details.
See Also:
HMH Growth Measure Assessment Types
Navigate the HMH Growth Reports Page
HMH Growth Measure Scores and Metrics