One assessment can be assigned at a time. Saved assignments are listed in your Assignment List and on each student's Things to Do list when the Available Date allows it.
The options for assessment settings vary, depending on the features available for an assessment.
➔ View the Add a Test quick reference guide by clicking the link below.
Add a Test (PDF 403 Kb)
1. Refer to the following table to begin.
Location |
Action |
Dashboard |
a. Click the header bar in the Assignments gadget. The Assignment List page appears. b. Click the Add Test button. |
Assignments tab |
➔ In the Add area, click Test. |
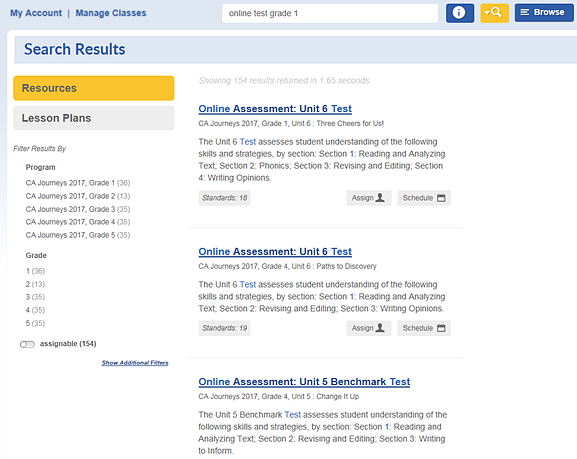
The Search for Resources box appears.

2. Type
a keyword, click the  button, and then select from the Resources
on the list. (See Search
Resources or Lesson Plans for details.) The program resources that
meet the selection criteria are displayed.
or
Click the  button and scroll through the list to locate the assessment. (See Browse
Resources for details.)

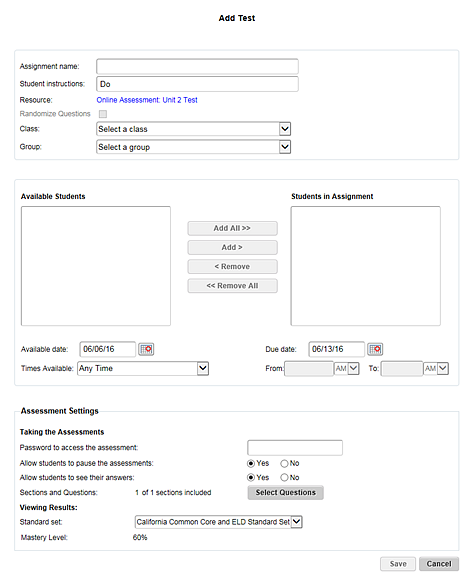
3. Locate the assessment resource to be assigned and click Assign. The Add Test page appears.

4. In the boxes provided, make the selections to assign the test as follows:
Option |
Step |
Assignment name |
➔ Type a name for the assignment. |
Student instructions |
➔ Type any necessary instructions for the assignment. |
Randomize Questions |
➔ Select or clear the check box. Note: If question randomization is not available, the Randomize Questions check box is disabled. You can change the setting on the Assessment Settings page.
|
Class |
➔ From the list, select the class to which the assessment is to be assigned. |
Group |
➔ If required, select the group to which the assessment is to be assigned. |
5. From the Available Students list, select the students to whom the assessment is to be assigned, and then click Add. The names of the selected students move to the Students in Assignment list. Note the following selection tips:
– To select two or more consecutive names, press and hold the Shift key and then click the names.
– To select two or more non-consecutive names, press and hold the Ctrl key or Apple key and then click the names.
– To move all the names on the left to the Student in Assignment list, click Add All.
6. Complete the date and time area as follows:
a. Select an Available date and a Due date for the assignment.
b. Select an option in the Times Available list—Any Time, Scheduled daily, or Schedule start and finish time.
c. If you selected Scheduled daily or Schedule start and finish time, type the start and finish times in the From and To fields and select AM or PM from the corresponding lists.
Note: Times must be typed in HH:MM format (For example: 10:00).

7. In the Assessment Settings area, set options as follows:
Note:
The options for assessment settings vary, depending on the features available
for an assessment. For example, not all assessments are automated-prescription
capable and not all automated-prescription-capable assessments have an
associated follow-up assessment.
You may save time when adding new assessment assignments by changing
your default assessment settings.
Option |
Step |
Passwords to access the assessment |
➔ Type a password in the box to secure the assessment. The following rules apply to assessment passwords: ○ Must be between 5–20 characters ○ Must be alphanumeric (A–Z, a–z, 0–9) ○ Cannot contain any special characters Note: Remind students to enter the password exactly as it is set. |
Allow students to pause the assessment |
➔ Click Yes or No. |
Allow students to see their answers |
➔ Click Yes or No. |
Sections and Question |
➔ Click Select Questions to view the sections and questions in the test. ○ To remove a whole section from the test, clear that section’s check box. ○ To remove individual questions from the test, expand each question and clear its check box if it is available. Note: To see the changes you make in the Select Questions dialog box, you must close and then reopen it. If a paired follow-up assessment is available, click its Resource name to preview it. |
Standard Set |
➔ For student review and prescriptions, select a Standard Set with which to associate the test. |
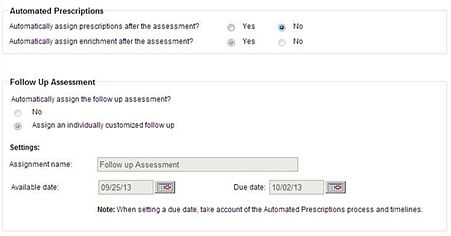
8. In the Automated Prescriptions area (if available), do the following:
a. Click Yes or No to specify whether to assign prescriptions (remediation) and enrichment resources after the assessment.

b. In the Follow Up Assessment area (if available), select one of the following options:
○ No
○ Assign a generalized follow up – If this option is available, you can edit the Sections and Questions in a generalized follow-up assessment. This feature might not be enabled on assessments that have been assigned to you by an administrator.
○ Assign an individually customized follow up – A customized follow-up assessment is generated dynamically according to each student’s individual performance.
9. Click Save. When the Available Date allows it, the saved assessment assignment appears in each student's Things to Do list and in your Assignment List.
See Also: