You can add any of the following non-assessment assignments to monitor your students’ progress and support their learning.
● Searchable Resource – a non-assessment resource that you search for and assign
● Text Only – a note or instructions that you write to be displayed in the list of resources
● URL (Uniform Resource Locator) – a clickable link to an online resource
➔ View the Add an Assignment quick reference guide by clicking the link below.
Add an Assignment (PDF 319 Kb)
1. Refer to the following table to begin.
Location |
Action |
Dashboard |
a. Click the header bar in the Assignments gadget. The Assignment List page appears. b. Click the Add Assignment button. |
Assignments tab |
➔ In the Add area, click Other Assignment. |
Electronic Teacher's Edition (ETE) |
a. From the Chapter Planner, select an element (lesson, test, or activity). A list appears. b. Click Assign. |
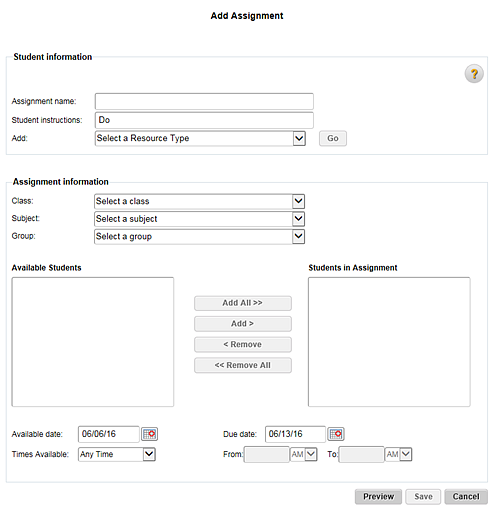
The Add Assignment page appears.

2. In the Student information area, do the following:
a. In the Assignment name box, type a name for the assignment.
b. In the Student instructions box, type any necessary instructions for the assignment.
c. From the Add list, select the resource to be assigned (Searchable Resource, Text Only, or URL), and then click Go. Depending on your selections, either a search box or a dialog box appears.
Note: If you have already selected a resource and it is listed on the page, skip to step 3.
d. Based on your selected resource type, continue with the steps below.
Resource |
Action |
Searchable Resource |
The Dashboard search box appears. a. Type a keyword in the search box to locate the resource to be assigned. (See Search Resources and Lesson Plans for details.) b. When you have located the resource, click Assign. |
Text Only |
The Add Text Resource dialog box appears.
a. Type instructions or notes for the assignment. b. Click Save. |
URL |
The Add URL Resource dialog box appears.
a. In the URL box, type or paste the URL. b. In the Link Name box, type the text to be used as the URL link. c. Click Save. |
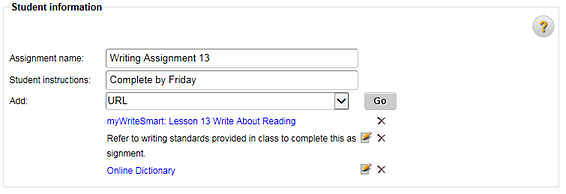
The newly added resource, text, and URL(s) display in the Student information area in the order in which you added them.

Note: To delete
a listed resource, click the ![]() icon. To edit a
Text Only resource, click the
icon. To edit a
Text Only resource, click the
![]() icon.
icon.
d. Repeat steps c and d to add more resources as required.
3. Complete the Assignment Information area as follows:
a. From the Class list, select the class to which the assignment is to be assigned.
b. From the Subject list, select the subject to which the assignment is to be assigned.
c. If required, select a Group to which the assignment is to be assigned.
d. From the Available Students list, select the students to whom the assignment is to be assigned, and then click Add. The names of the selected students move to the Students in Assignment list.
Note: ○ To select two or more consecutive names, press and hold the Shift key and then click the names. ○ To select two or more non-consecutive names, press and hold the Ctrl key or Apple key and then click the names. ○ To move all the names on the left to the Student in Assignment list, click Add All. |
e. Select an Available date and a Due date for the assignment.
f. Select an option in the Times Available list—Any Time, Scheduled daily, or Schedule start and finish time.

g. If you selected Scheduled daily or Schedule start and finish time, type the start and finish times in the From and To fields and select AM or PM from the corresponding lists.
Note: Times must be typed in HH:MM format (For example: 10:00).
4. Click Preview to view the assignment as your students see it.
5. Click Save. The assignment is activated. The saved assignment appears in your Assignment List and on each student's Things to Do list when the Available Date allows it.
CAUTION: If you accidentally assign an assessment resource from the Dashboard when adding a Searchable Resource, the Add Test page will open and you will lose any unsaved work from the Add Assignment page. To avoid this, you can first save the assignment and then edit it.
See Also: