 and select the Assign option.
HMH Ed™ allows you to locate resources and create assignments on the HMH Resources page. When creating assignments, you can select to share it in Google Classroom, allowing your students to access the assignment in Ed or Google Classroom. You and your students can then view the assignment status and scores in either platform.
Note: ● Some program assignments are available only with specific related products, such as Growth Measure assessments or Writing Task; for details about creating these types of assignments, see Assign Growth Measure Assessments or Assign Writing Task Assignments.
● If you have created customized lessons, you can assign resources from your My Lessons page (located in the Discover / My Stuff tab). See Create Lessons for details.
● Only resources from a program selected for a class (or associated to a selected program) can be assigned to a class. Programs are selected for classes on the Program Settings page; additionally, programs may be available to a class if the programs are associated to the selected program and shown in the Also Available to you section of your program list. For complete details, see Manage Programs for Classes. |
1. Find the resource you need to assign. See About Resources for details about various ways to locate resources and filter the resources list.
2. On
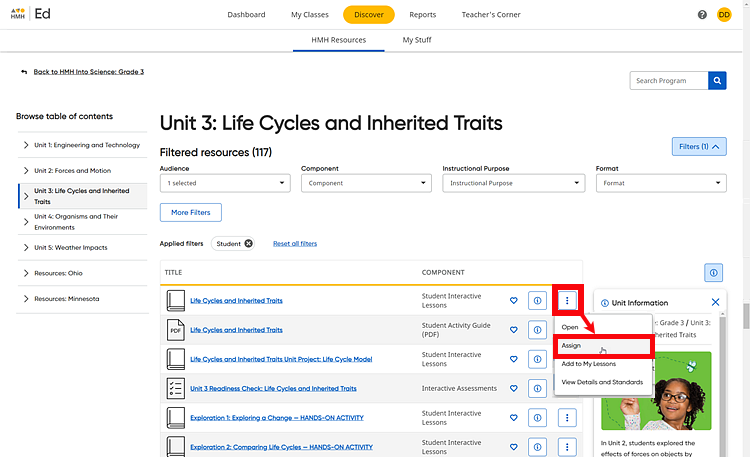
the row containing the resource, click the vertical ellipsis button  and select the Assign option.

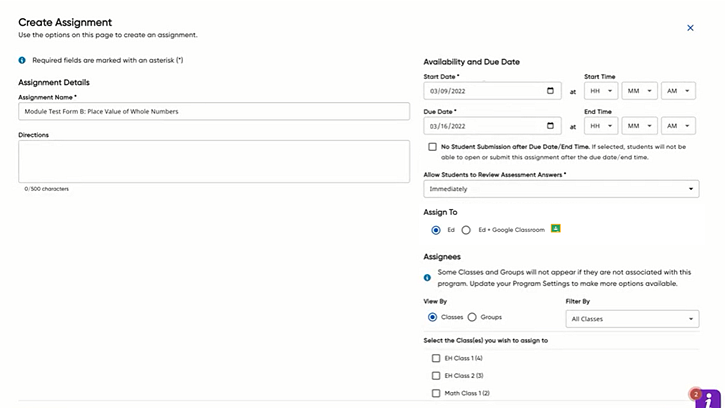
The Create Assignment page appears.

3. In the Assignment Details section, complete the fields as follows:
Field |
Action |
Assignment Name |
Note that the assignment name defaults to the module or lesson name. ➔ Type a different name for the assignment, if needed. |
Directions (Optional) |
➔ Type instructions for the students to follow while completing the assignment. |
4. In the Availability and Due Date section, complete the fields as follows:
*Note: Due Date features apply to users in Ed, but are not enforced on the Google Classroom side at this time.
Field |
Action |
Start Date |
This is the date that the assignment will be available to the selected students in Ed.
Note: For most assignments, the start date defaults to the current date.
➔ Click the calendar icon and select a different start date, if needed.
|
Start Time (Optional) |
This is the time that the assignment will be available to the selected students in Ed.
Note: – Students can only access the assignment once the start time on the start date has been reached. – If no start time is set, the assignment becomes available to the selected students at the beginning of the day (midnight) on the start date. a. In the hour (HH) list, click the down arrow and select the hour to start.
b. In the minute (MM) list, click the down arrow and select the minute to start. c. In the AM/PM list, click the down arrow and select AM or PM. (AM is the default.)
|
Due Date |
This is the date that the assignment is due to be completed in Ed. *On the Google Classroom side, the due date is not enforced.
If the due date is being enforced, this is the date that the selected students will no longer be able to access or submit this assignment. If the due date is not being enforced, then this is the recommended date that the assignment is due to be completed. Important:
To enforce the due date and prevent students from accessing or
submitting the assignment after the due date (or end time) has
passed, you must select the No
Data Submission after Due Date/End Time check box.
Note: – For most assignments, the due date defaults to seven days (1 week) from the current date. – If the due date is enforced (No Data Submission after Due Date/End Time check box is selected) and no end time is specified, then students will lose the ability to access or submit the assignment at the end of the day (midnight) of the due date.
➔ Click the calendar icon and select a different due date, if needed.
|
End Time (Optional) |
This is the end time that the assignment is due to be completed in Ed. This feature applies to Ed only. *On the Google Classroom side, the end time is not enforced.
If the due date is being enforced, this is the time (on the due date) that the selected students will no longer be able to access or submit this assignment. If the due date is not being enforced, then this is the recommended end time for the assignment. Note: – If the due date is enforced (No Data Submission after Due Date/End Time check box is selected) and no end time is specified, then students will lose the ability to access or submit the assignment at the end of the day (midnight) of the due date. – If the due date is not being enforced, the due date and end time serve as a guideline only; students will continue to have access to the assignment even after the due date and end time. a. In the hour (HH) list, click the down arrow and select the hour to end. b. In the minute (MM) list, click the down arrow and select the minute to end. c. In the AM/PM list, click the down arrow and select AM or PM. (AM is the default.)
|
No Data Submission after Due Date/End Time (Optional) |
This check box allows you to enforce the due date and end time, preventing students from accessing or submitting the assignment after the due date and end time. This feature applies to Ed only. *This feature is not enforced on the Google Classroom side at this time.
➔ Select this check box to enforce the due date and (if specified) end time.
Note: When this check box is selected for an assignment: ○ For teachers, the due date and end time is noted in the assignment card on the Dashboard, and a note stating "No late work accepted" appears for this assignment on the Assignment Overview page. ○ For students, a note stating "No late work accepted" appears for this assignment on the Dashboard assignment card and in the Due Date column of the Assignment page. ○ For students actively working in the assignment (assignment is open) when the due date/end time passes, they are allowed to complete and submit the assignment, even if this submission occurs after the due date/end time. However, if they close the assignment without submitting it, they will not be able to reopen the assignment.
|
Allow Students to Review Assessment Answers (appears only for specific assignment-types; see note for details) |
Note: This field appears for all program assessments; it also appears for custom assessments and for document-based investigation writing activities in the Social Studies programs, though these assignment types (along with Math 180 and growth measure assessments) are not available with the Google Classroom option. This feature applies to Ed only. *This feature is not enforced on the Google Classroom side at this time.
This allows you to specify when students can review the answers to a completed and scored assessment or assignment. The default is set to Immediately, which allows students to review answers as soon as the assignment is scored.
➔ Click in the field and then select a date period option from the list.
When the assignment is completed and scored, students see a note on the Done tab of their Assignments page (as shown below) and on their Scores page, stating the date that the assignment will be available for review.
|
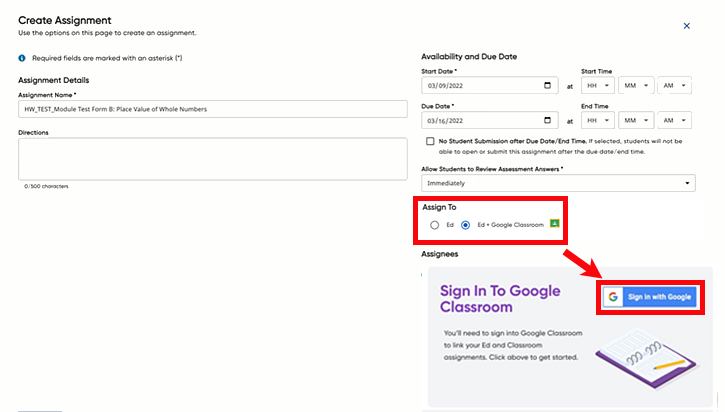
5. In the Assign To section, select Ed + Google Classroom.
6. If necessary, sign in to your Google Classroom account by clicking the Sign In with Google button and following the Google sign in prompts.

Note: When signing in to Google, be sure to accept ALL terms to continue. Failure to accept all of these will cause errors when trying to assign or access assignments.
When you are signed in to Google Classroom, the Create Assignment page updates to allow you to complete the Assignees fields.

Note:
–  Only the classes with access to the selected program
appear in your class list on this page. If any of your classes do not have access to the selected
program, they will not be listed because you cannot assign this program
content to them. You can change the classes that have access to programs
any time on the Program Settings
page. For details on selecting programs for your classes, see Manage
Programs for Classes.
– If you have linked your Ed classes with Google Classroom classes, the associated class names are displayed in the list. (See Link Ed Classes with Google Classroom for details.)
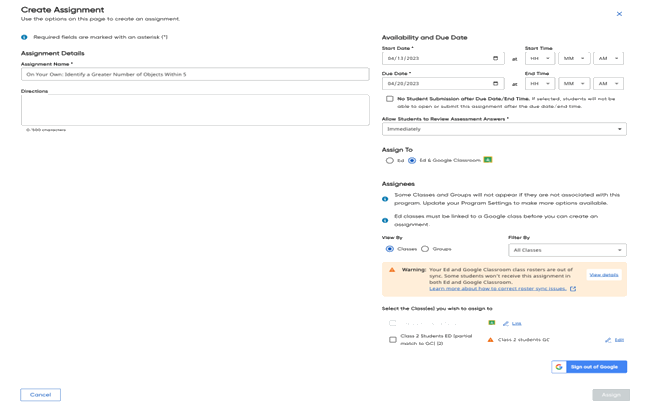
– The linked classes for Ed and Google Classroom must match, and the students in these classes must be rostered in both platforms with matching usernames. A warning message appears if any mismatches exist.

– The sync status of linked Google classes are indicated as follows:
![]() – linked class with no roster sync
errors
– linked class with no roster sync
errors
![]() – linked class with roster sync
errors
– linked class with roster sync
errors
– Assignments cannot be assigned to classes with out-of-sync errors.
7. Manage linked classes as follows:
Action |
Steps |
View the details of the out-of-sync classes |
a. In the warning message box, click View details.
Errors may include: – no students rostered in the linked Google class – no matching students found in the linked Google class – one or more students not matched in the Google class
b. Review the link errors and correct, as needed. |
Link an Ed class to a Google Classroom class |
a. In the row of the class to be linked, click Link.
A dialog appears with a list of Google Classroom classes.
b. In the Google Classroom class list, select the Google class to be linked with this Ed class. |
Change the Google Classroom class to be linked to an Ed class |
a. In the row of the class to be changed, click Edit.
A dialog box appears with a list of Google Classroom classes.
b. In the Google Classroom class list, select the Google class to be linked with this Ed class. |
Remove the linked class |
a. In the row of the class to be removed, click Edit.
A dialog box appears with a list of Google Classroom classes.
b. Click Remove Link to remove the currently linked class. |
8. In the Assignees section, select classes as follows:
Field |
Action |
View By / Filter By |
If you want to view the list of students in a class or the groups created for a particular class, click the down arrow in the Filter By list and select a class.
a. In the View By list, select Classes to assign to a class (or classes) or select Groups to assign to a group (or groups).
Note: Only classes that are fully synced or partially synced are available to create an assignment. Class names with sync errors appear dimmed until the errors are corrected. For partially synced classes, only students rostered in both Ed and linked Google Classroom class receive the assignment.
b. If you want to view the list of students in a class or the groups created for a particular class, click the down arrow in the Filter By list and select a class.
If you filter by a class/group that has no roster sync errors, the check boxes for all the students in the selected class are checked by default, indicating that all students in the class/group are selected to receive the assignment. If you filter by a class/group that includes some students with a roster sync error, those students appear as unavailable (grayed out) and can not be selected to receive the assignment.
If you select Groups, only groups with students that are fully synced or partially synced are available to be selected for the assignment, and only students within the available groups that are rostered in both the Ed and the linked Google Classroom class can receive the assignment. If necessary, click Select all to ensure that students with no sync error receive the assignment.
c. If you prefer to create the assignment for only some of the students in a selected class/group, clear the check box beside any student who is not to receive this assignment.
If the linked class has no matching students, you see a message within the class list and prompted to link the classes. (See Link Ed Classes with Google Classroom for details.)
|
9. Click
 .
.
The assignment is created and will be available to the selected class/group on the designated start date. Students can open and submit the assignment in either Ed or Google Classroom.
You can monitor assignment status and manage
assignments on the Assignments
pages. Assignments shared in Google Classrooms appear with a Google Classroom
icon ![]() on the Assignments Overview and
the Assignment Details pages.
See Manage Assignments for details.
on the Assignments Overview and
the Assignment Details pages.
See Manage Assignments for details.
See Also: